

How To Fix Problem With Pnp Devices Windows 10
Outdated or malfunctioning drivers are the root crusade of many Windows 10 bluescreen errors. The PNP_DETECTED_FATAL_ERROR is no different. Usually caused by malfunctioning Plug and Play (PNP) drivers or devices, it tin easily be resolved using the following methods.
And then, here's how you lot fix the PNP_DETECTED_FATAL_ERROR in Windows 10.
1. Update or Roll Back Drivers
One of the easiest ways to resolve a plethora of bluish screen errors is to ensure that your computer has the latest drivers installed.
However, if Windows 10 update your drivers recently and the error appeared right later on, it's all-time to revert to the old version. Drivers tin can easily be managed using Windows in-built Device Director.
How to Update a Driver
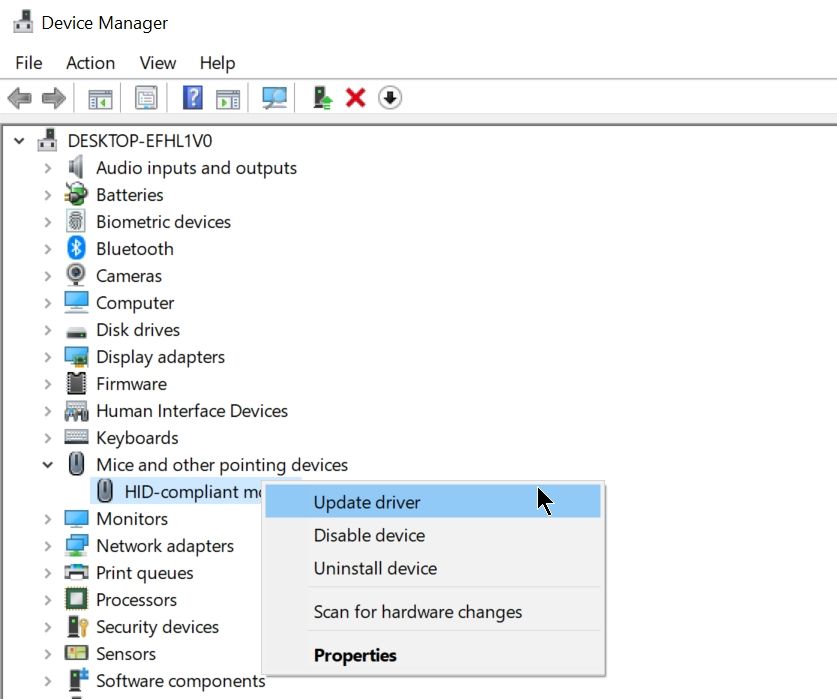
- PressWindows Key + Rto launch the Run awarding. Type indevmgmt.mscin the text box and hit Enter to open up the Device Manager.
- In the Device Manager, navigate to the desired device and expand the menu. Right-click on the commuter and selectUpdate Driver. Since we're dealing with the PNP_DETECTED_FATAL_ERROR, it'southward all-time to update drivers related to devices such as keyboards, mice, headphones, etc.
- In the window that opens, click onSearch automatically for updated commuter software.
- Windows will automatically download and install the latest drivers.
- Reboot your estimator.
How to Whorl Back Drivers
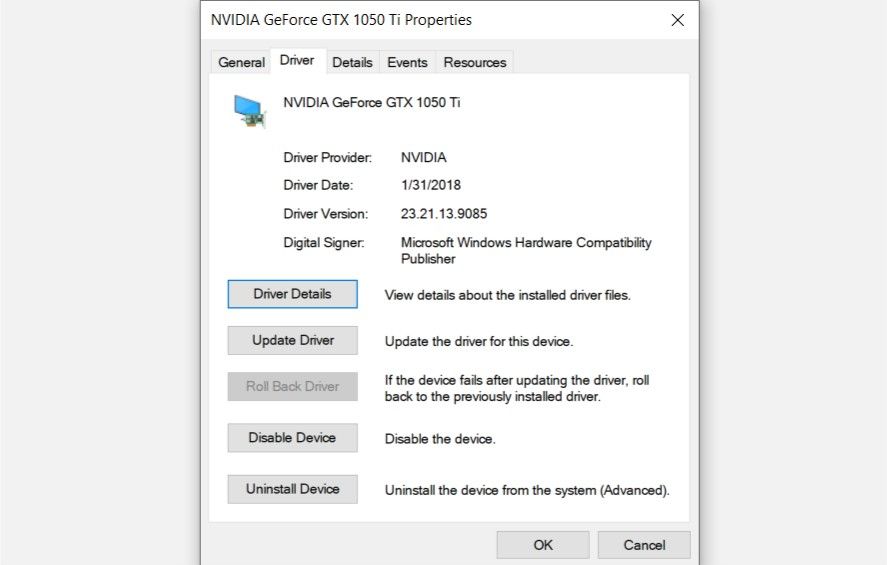
- PrintingWindows Key + Rand typedevmgmt.mscin the text box, then hit Enter.
- In the Device Manager window, look for the required device and expand the menu.
- Right-click on the desired commuter and selectProperties.
- Under theDrivertab, click onRoll Back Commuter.
- Afterward the commuter has been installed, reboot your reckoner.
2. Kick the Computer in Safe Mode
Many a time, the PNP_DETECTED_FATAL_ERROR blueish screen may be acquired by problematic tertiary-political party software or drivers. To diagnose this issue, it's necessary to boot your figurer into safe way.
When in safety mode, Windows boots with only essential services and applications running. All third-party software and drivers will be disabled. Alternatively, users tin can take a look at some of the best free Windows 10 repair tools to skip going through this hassle.
How to Boot in Safe Mode
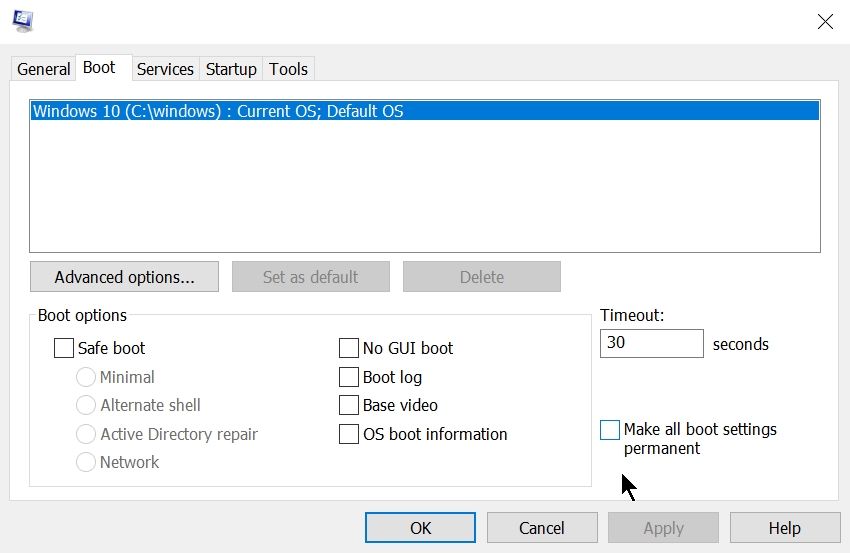
- In theStarting time carte du jour search bar, blazonsysconfig and click onSystem Configuration in the search results.
- Under theBoot tab, bank check theSafe bootselection and also select theNetworksub-pick nether it.
- Click OK and reboot your computer.
Later booting into safe style, wait for a few minutes to encounter if the mistake pops up again. If information technology doesn't, then it's likely existence acquired past recently installed software or a driver. If you recently installed whatsoever new drivers, now is the time to uninstall them using the Device Manager.
How to Uninstall a Driver
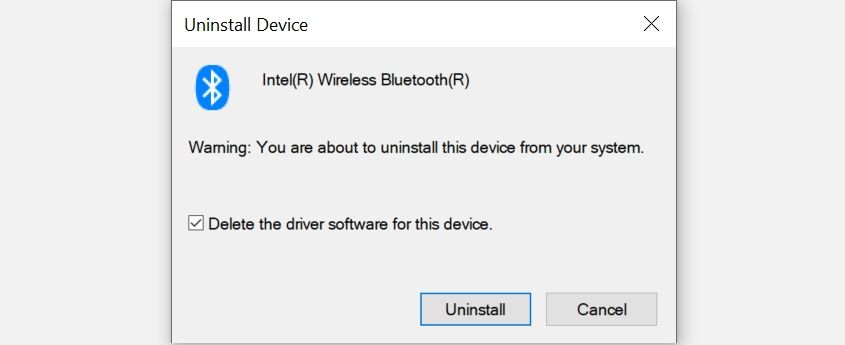
- PrintingWindows Central + Rand typedevmgmt.mscin the Run awarding. Press Enter.
- In theDevice Manager, navigate to the device type you (or Windows ten) recently installed a driver for, and expand the menu. Right-click on the specific device and click onUninstall Device.
- On the Uninstall Device prompt, check theDelete the driver software for this devicebox.
- Click on OK and expect for Windows to uninstall the commuter.
- Reboot your computer.
iii. Use Startup Repair
For users unable to reach the lock screen, Startup Repair is the all-time option. To launch Startup Repair, follow these steps:
- Showtime your estimator by pressing the ability push. When the motherboard manufacturer's logo shows up, hold the power button until your computer switches off.
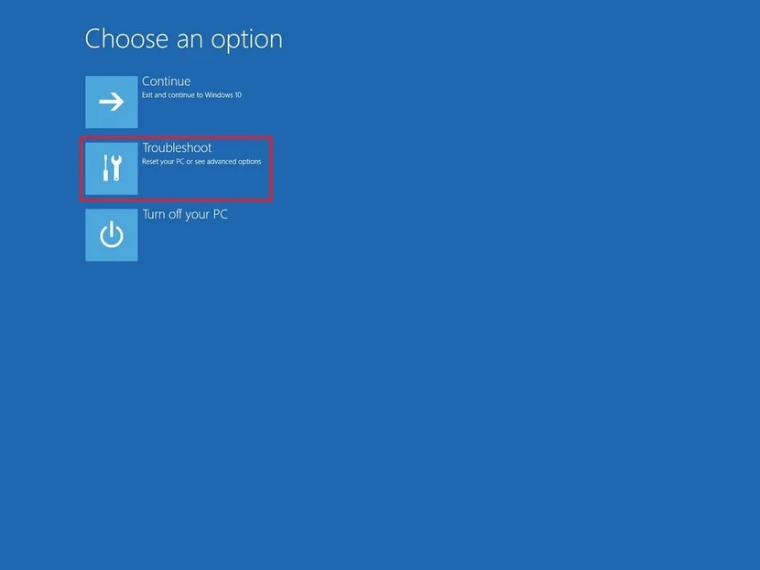
- Repeat step ane at least three times until yous boot into Windows Recovery Environment. It'll be a blueish screen withChoose an selection displayed at the top.
- From the options given on the screen, click onTroubleshoot.
- On the side by side screen, click onAdvanced optionsand then click onStartup Repair.
- Wait for Windows to detect and resolve the issue automatically.
Subsequently Startup Repair, you should be able to boot into your computer and try out other fixes if the blue screen pops upwards again.
4. Employ SFC and DISM to Check for Corrupt System Files
DISM stands for Deployment Prototype Servicing and Management, and it helps detect and ready problems in the organisation image. It is essential to use this utility whenever users encounter a blue screen error. Here's how to apply the DISM command:
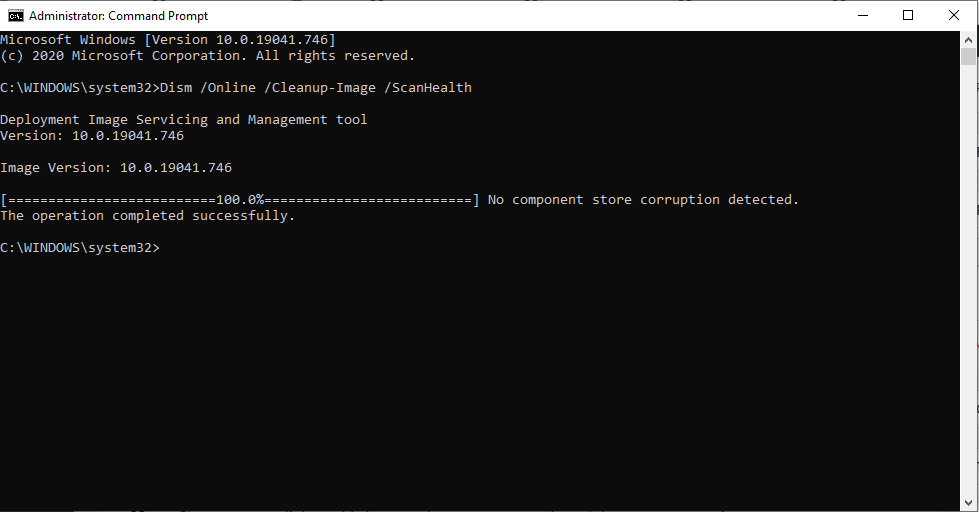
- In theStart menu search bar, blazoncmd,and from the search results, correct-click onCommand Prompt > Run as administrator.
- In the Command Prompt console, blazonDISM /Online /Cleanup-prototype /Scanhealthand press Enter.
- Wait for the procedure to exist over, then typeDISM /Online /Cleanup-image /Restorehealth and striking Enter.
- Windows volition repair whatsoever problems with the system image.
SFC is an in-built utility in Windows that checks and repairs corrupt or missing system files. It can exist used to tackle a variety of common errors and BSODs in Windows. On top of that, it's easy to employ:
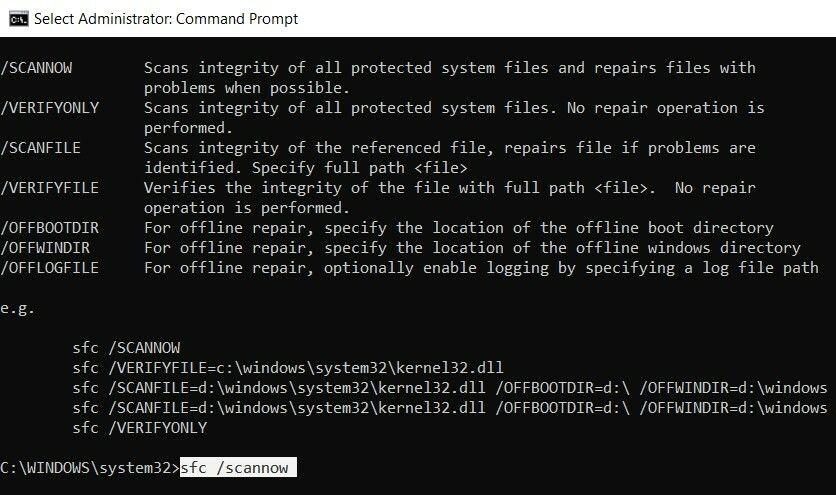
- In theShowtime carte search bar, typecmdand correct-click onCommand Prompt > Run as administrator from the search results.
- In the console, typesfc /scannowand striking Enter.
- Wait for the procedure to be over, and close Command Prompt.
- Reboot the calculator.
v. Run System Restore
Windows Organization Restore is a handy application that allows users to restore their computer to an before state when things were running smoothly. Windows automatically creates a restore point weekly and likewise when a new programme or driver is installed. But you can create a restore point manually as well:
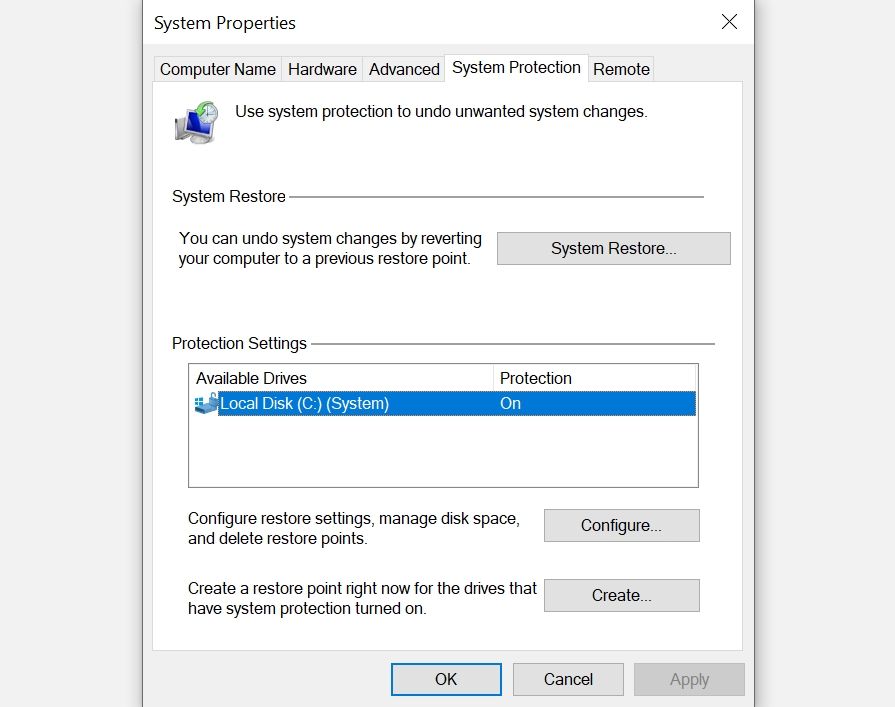
- In theStart card search bar, blazonSystem Restore.
- In the search results, click onCreate a organisation restore point.
- On the adjacent Window, click onCreate. If the option is greyed out, click on a disk partition underProtection Settings > Configure > Turn on organization protection. Click on OK.
- Enter a name for the restore indicate and click on OK.
If the system restore utility is non working properly, then users can attempt these fixes to resolve the problem/
The Piece of cake Way to Prepare the PNP_DETECTED_FATAL_ERROR
Even novice users tin easily ready a seemingly intimidating blueish screen like the PNP_DETECTED_FATAL_ERROR by following the steps mentioned above.
It'southward always a skilful idea to ensure that your computer has the latest drivers installed. Users are also advised to create a system restore point before attempting highly technical fixes.
Source: https://www.makeuseof.com/how-to-fix-the-pnp_detected_fatal_error-in-windows-10/
Posted by: weeksmeren1965.blogspot.com
0 Response to "How To Fix Problem With Pnp Devices Windows 10"
Post a Comment